|
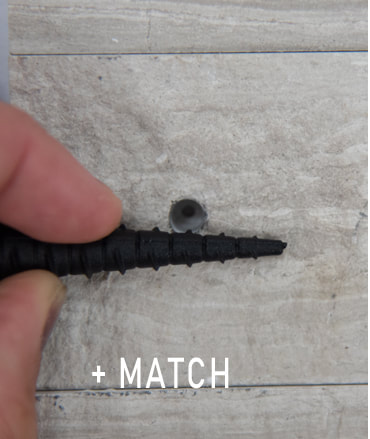
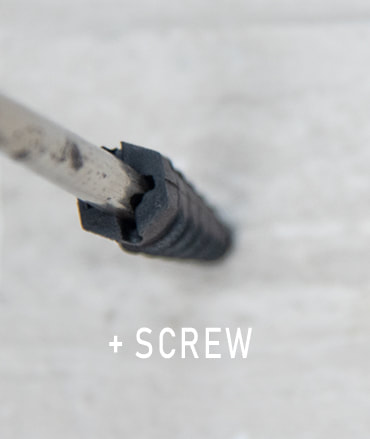
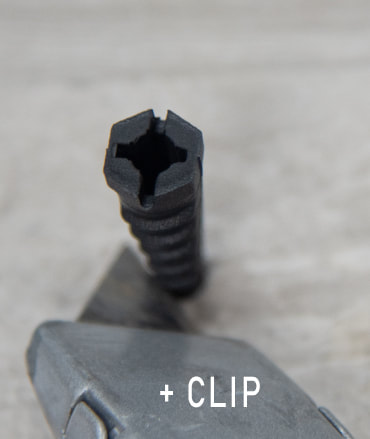
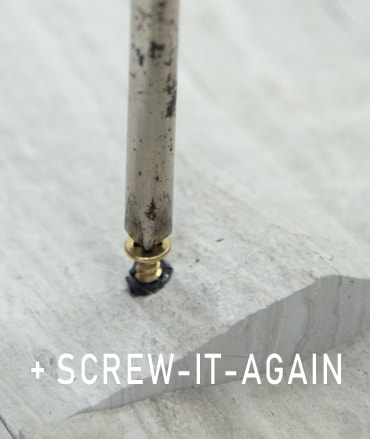
At the turn of the last century, the homeowner didn’t have many fastener choices for concrete and other types of masonry. The common solution was to use a hardened nail, or drill a hole, insert a wood plug, and put a screw in the center. Now we find ourselves with more solutions than the typical homeowner needs. In this article, we’ll show you some concrete fasteners options and how they don’t stand up to our Screw-It-Again masonry anchor. The easiest, the fastest, and most secure way of creating strong threads in concrete and other types of masonry is the Screw It Again masonry anchor! The Screw It Again masonry anchor can create secure threads in concrete in 4 easy steps which takes just a couple minutes. In an independent test by a 3rd party, Screw It Again masonry anchor showed it can withstand a pull force of close to 170 pounds beating out its most popular competitor. This makes it the most secure and strongest solution on the market! There are a lot of other solutions you can try when you need to secure something to a masonry or concrete walls. As with most repairs, it's best to start with the easiest solution first and move to the more elaborate and time consuming options like chemically anchoring a bolt. Below are 4 of the most common methods/types of creating secure threads in concrete and other types of masonry. Method #1 - Screw It Again Masonry Anchor
Method #2 - Small Plastic AnchorsThis is the most common fastener you will find for concrete, brick, and tile. They are inexpensive but if installed incorrectly, it will leave you with an even bigger problem. These fasteners expand when a screw it inserted but if you accidentally dill their pilot hole too large, then the anchor won’t hold enough weight or at all. Even when installed properly, they usually only hold 20 lbs , should only be used for light objects, and don’t hold properly when pulled outward. Method #3 - Hammer Set AnchorsThe best feature of hammer-set anchors is that they’re quick to install and you don’t have nuts and washers to fuss with. You just drill the hole to the right depth and hammer it into the wall. The main problem with these types of anchors is the hammering part. This anchors tend to be made of metal and when hammered into a concrete wall, they usually crack the concrete or tile and now their hold has been weakened. Also after these anchors are hammered in, there is no easy way of removing them. So if they loosen over time, the only way of replacing it is to drill out the anchor and insert a new one. Method #4 - Sleeve AnchorsThis type of anchor is a screw with inside either a plastic or metal tube with a slit down both sides. This is another type of expanding anchor that when you tighten the screw, it pulls the back portion of the sleeve toward the front which forces the middle to push out and embed itself in the material. They create a very tight hold and can withstand a lot of weight but once again, if installed incorrectly they can cause a lot of problems. If you overtighten the screw, the fastener will break or break the concrete around the hole you drilled. If this fastener fails, you’ll need to drill another hole a few inches away and try again.
Until now, it has been challenging as there never was a "one-size-fits-all" solution to the problem until Screw It Again. Screw It Again masonry anchors are available online in our store or through local hardware stores like True Value, Ace Hardware, and Do It Best Hardware.
30 Comments
10/19/2020 10:44:52 pm
It is great blog post. I am Always read your blog. Helpful and Informative blog. Thanks for sharing these information with us. 11/1/2023 02:32:29 am
This article answered all my questions. Well done! 12/8/2021 06:24:04 pm
You make a great point about laying down the concrete in 4 steps. I need to get a contractor to install an anchor winch. I'll have to consider getting a professional to do it. 9/25/2023 05:42:47 am
Thanks for sharing this valuable content. It's exactly what I was looking for. 1/7/2022 06:25:04 am
I never knew that a masonry anchor can create secure threads in concrete in 4 easy steps which take just a couple of minutes. I never thought that it would be like this, it is an intriguing article to read and I will also share this with my aunt. Thank you for the information about masonry. 5/16/2022 12:53:59 pm
Then you may have to wait a few more days to let the concrete harden before subjecting it to foot or vehicular traffic. The process of installing concrete can be broken into three phases, 10/27/2023 03:00:55 am
Thank you for sharing this valuable information. I found it to be highly informative on this site. Please keep sharing more insights and updates. 12/13/2022 12:10:38 pm
This anchors tend to be made of metal and when hammered into a concrete wall, they usually crack the concrete or tile and now their hold has been weakened. Thank you for the beautiful post! 12/13/2022 06:45:15 pm
Great tip about pulling out anchoring bolts when you need to. My flooring needs to be repaired. I'll have to consider getting a contractor to help with the work. 9/28/2023 04:55:56 am
It's great content you posted, looking forward to a more awesome one. 1/19/2023 10:11:31 am
Thanks for sharing this post, it is very helpful article. 2/20/2023 07:57:07 am
Thanks for posting. Looking forward to the next one! 2/20/2023 11:24:24 am
Thanks for sharing. Looking forward to the next one! 2/20/2023 12:11:33 pm
Awesome as always. Thanks for sharing! 3/29/2023 09:31:59 pm
Can you recommend any other blogs/websites/forums that deal with the same topics? Thanks! 3/30/2023 08:33:00 pm
Nice post. I learn something more challenging on your different blogs everyday. Thanks for sharing. 9/8/2023 01:03:52 am
Along with the shuttering, a 25 mm cover block of concrete is used. The placement of the 25 mm cover block with reinforcement to determine the true spacing of the beam is shown in the figure with clarity. 40 mm Cover Block: Set the cover block in a position that fits the plywood. See how it is holding the shuttering and the bar below. 9/15/2023 01:31:43 am
Amazing and helpful source of information. I’m glad you shared this useful info with us. 10/18/2023 06:22:08 am
Amazing and helpful source of information. I’m glad you shared this useful info with us. 5/17/2024 04:00:02 am
Installing concrete and masonry anchors involves selecting the appropriate type of anchor for the specific material and load requirements, such as wedge anchors, sleeve anchors, or epoxy anchors. The installation process typically begins with drilling a hole of the correct diameter and depth, using a hammer drill for hard materials like concrete or masonry. After cleaning the hole to remove debris, the anchor is inserted and expanded or bonded into place, ensuring a secure fit. Proper installation is crucial for the anchor's performance, providing stability and support for the attached fixtures, whether for structural, safety, or decorative purposes. 5/21/2024 05:00:35 am
Your contents are too straightforward to browse and easy to understand. 5/22/2024 04:22:30 am
Your content is refreshing and thought-provoking. 6/17/2024 07:36:34 am
Installing concrete and masonry anchors involves a few critical steps to ensure secure and stable fastening. First, choose the appropriate type of anchor based on the load requirements and the material's characteristics. Drill a hole into the concrete or masonry surface using a hammer drill and the correct drill bit size. Clean out the hole to remove any dust and debris, which can affect the anchor's grip. Insert the anchor into the hole, and then tighten it according to the manufacturer's specifications. This process ensures that the anchor is properly seated and capable of supporting the intended load. 7/14/2024 11:48:51 pm
Sharing with friends! Thanks! Leave a Reply. |
AuthorVisit our blog page to be kept abreast of everything new at Screw-it-Again Categories |
 RSS Feed